How to Identify, Troubleshoot, and Fix a Running Toilet Before It Spikes Your Water Bill
Need a Reliable Plumber?
Call Us NowThe subtle, persistent sound of a running toilet is more than just a minor household annoyance; it is a mechanical failure that directly impacts your monthly utility expenses. In Kirkland, WA, and throughout the Eastside, water conservation is both an environmental priority and a financial necessity. A single running toilet can waste hundreds of gallons of water per day, leading to unexpectedly high water bills and unnecessary strain on your home's plumbing system.
For homeowners and business operators, understanding how to diagnose and resolve this common plumbing issue is essential. While modern plumbing systems are highly reliable, the internal components of a toilet tank are constantly submerged in water and subjected to daily wear and tear. Over time, rubber seals degrade, plastic components become brittle, and mechanical linkages fall out of alignment.
This comprehensive guide from Rooter-Pal Plumbing, LLC will walk you through the anatomy of your toilet, the exact steps required to identify the source of the leak, and the professional methods for executing a repair. Whether you manage a commercial property in Bellevue or own a historic home in Kirkland, these troubleshooting principles remain the same.
Short Answer
A running toilet is almost always caused by a failing flapper valve, an improperly adjusted float, or a defective fill valve. To stop the immediate flow of water and prevent further waste, reach behind the base of the toilet and turn the water supply shut-off valve clockwise until it stops. The most permanent and reliable fix requires opening the toilet tank, identifying which specific internal component has degraded, and replacing it with a high-quality, matching part. If adjusting the float or replacing the flapper does not resolve the continuous running, the entire fill valve assembly must be replaced.
The Anatomy of Your Toilet Tank
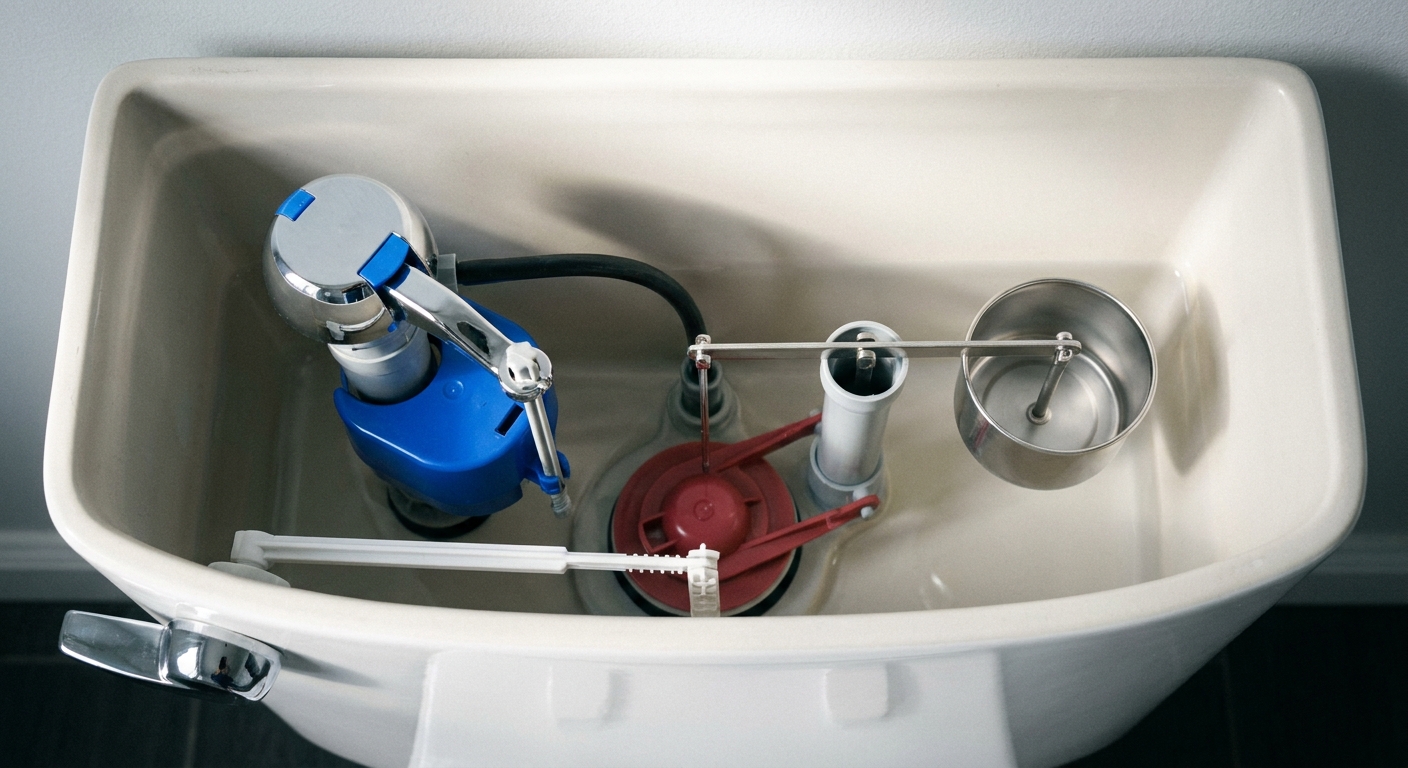
Before attempting any plumbing repair, you must understand the components you are working with. A standard gravity-flush toilet operates on a relatively simple but precise mechanical system. When you understand how these parts interact, troubleshooting becomes a logical process of elimination.
The Fill Valve and Float
The fill valve is the mechanism responsible for refilling the tank after a flush. It is connected directly to your home's water supply line. Attached to the fill valve is a float mechanism—either a traditional floating ball on a brass arm or a modern float cup that moves vertically along the valve shank. As the water level rises, the float rises with it, eventually triggering the fill valve to shut off the water flow at a predetermined height.
The Flush Valve and Flapper
Located at the bottom center of the tank, the flush valve is the large opening that allows water to rush into the toilet bowl. This opening is sealed by the flapper, a rubber or silicone disc that lifts when you press the flush lever. When the tank empties, the flapper drops back down, creating a watertight seal so the tank can refill.
The Overflow Tube
The overflow tube is a vertical pipe connected to the flush valve assembly. It serves as a critical safety feature. If the fill valve fails to shut off, excess water spills into the overflow tube and drains safely into the toilet bowl, preventing the tank from overflowing onto your bathroom floor.
The Trip Lever and Chain
The trip lever is the handle on the outside of the tank. It connects to a metal or plastic arm inside the tank, which is linked to the flapper via a small chain. When you press the handle, the arm lifts the chain, which in turn lifts the flapper to initiate the flush.
Prerequisites: Tools and Materials You Will Need
Professional plumbing repairs require the right tools and preparation. Attempting a repair with improper equipment often leads to damaged porcelain or stripped fittings. Before beginning your troubleshooting process, gather the following items:
Adjustable Wrench: Required for loosening and tightening the water supply line and fill valve locking nuts. Sponge and Small Bucket: Essential for removing residual water from the bottom of the tank before replacing components. Food Coloring or Dye Tablets: Used for diagnosing silent flapper leaks. Replacement Parts: Depending on your diagnosis, you may need a universal flapper, a new fill valve, or a complete toilet repair kit. Rubber Gloves: To protect your hands from heavily chlorinated tank water and mineral deposits. Towels: To protect your bathroom floor and clean up minor drips.
Step-by-Step Instructions: How to Troubleshoot and Fix a Running Toilet
Follow this systematic approach to isolate the problem and execute a lasting repair. Rooter-Pal Plumbing, LLC recommends performing these steps in order, starting with the most common and easily accessible components.
Step 1: Perform the Dye Test to Check the Flapper
Often, a toilet runs silently, or you may hear it intermittently "hiss" as the fill valve tops off the tank. This is commonly known as "phantom flushing" and is almost always caused by a degraded flapper that is slowly leaking water into the bowl.
1. Remove the toilet tank lid carefully and set it on a flat, protected surface. 2. Drop 4-5 drops of dark food coloring (blue or red works best) into the tank water. 3. Do not flush the toilet. Wait 15 to 20 minutes. 4. Inspect the water in the toilet bowl. If the bowl water has taken on the color of the dye, your flapper is failing to maintain a watertight seal and must be replaced.
Step 2: Inspect the Trip Lever and Chain Tension
Sometimes, the flapper itself is in good condition, but the mechanical linkage is preventing it from seating properly.
1. Check the chain connecting the flush lever arm to the flapper. 2. If the chain is too tight, it will hold the flapper slightly open, allowing water to continuously escape. 3. If the chain is too long, the excess slack can get sucked underneath the flapper as it closes, breaking the seal. 4. Adjust the chain so there is only about 1/2 inch of slack when the flapper is fully closed. Ensure the clip is securely fastened to the lever arm.
Step 3: Replace a Degraded Flapper
If the dye test confirmed a leak and the chain tension is correct, the flapper rubber has likely degraded due to age, hard water minerals, or chemical cleaners.
1. Turn off the water supply valve located behind the toilet base. 2. Flush the toilet to empty the tank. Use your sponge and bucket to remove the remaining water at the bottom. 3. Unclip the chain from the flush lever arm. 4. Slide the sides of the old flapper off the pegs on the sides of the overflow tube. 5. Take the old flapper to a local Kirkland hardware store to ensure you purchase an exact match, or use a high-quality universal flapper. 6. Install the new flapper by sliding its ears over the overflow tube pegs. Reattach the chain with the proper 1/2-inch slack. 7. Turn the water supply back on and allow the tank to fill. Perform the dye test again to confirm the repair.
Step 4: Check the Water Level and Adjust the Float
If water is continuously spilling into the top of the overflow tube, your fill valve is not shutting off early enough. The water level in the tank should rest approximately 1 inch below the top of the overflow tube.
1. Locate the float mechanism. If you have an older ballcock style with a brass arm, locate the adjustment screw where the arm meets the valve, or gently bend the brass arm downward to lower the float. 2. If you have a modern fluidmaster-style valve with a float cup, locate the plastic adjustment screw next to the float. Turn it counterclockwise with a screwdriver to lower the water level. 3. Flush the toilet and observe the refill cycle. Ensure the water stops flowing completely before it reaches the top of the overflow tube.
Step 5: Replace a Defective Fill Valve
If you have adjusted the float to its lowest setting and the water continues to run, or if the valve itself is spraying water from the top cap, the internal seals of the fill valve have failed. The entire unit must be replaced.
1. Shut off the water supply and completely drain the tank using your sponge. 2. Place a bucket under the supply valve connection outside the tank. 3. Use an adjustable wrench to disconnect the water supply line from the bottom of the toilet tank. 4. Remove the plastic lock nut securing the old fill valve to the tank. Pull the old valve out from above. 5. Insert the new fill valve into the hole, ensuring the rubber gasket is seated properly inside the tank. 6. Hand-tighten the lock nut from below, then use pliers to turn it one-half turn further. Do not over-tighten, or you will crack the porcelain tank. 7. Reconnect the water supply line, attach the new refill tube to the overflow pipe, and turn the water back on. Check carefully for leaks at the base of the tank.
Operational Tradeoffs: Repair vs. Replacement
When dealing with recurring plumbing issues, property owners must weigh the operational tradeoffs between repairing an existing fixture and upgrading to a new one.
The Case for Repair: Replacing a worn flapper or fill valve can extend the life of your toilet without replacing the entire fixture. If your toilet is less than 10 years old, matches your bathroom aesthetic, and flushes powerfully, repairing internal tank components is the most logical and economical choice.
The Case for Replacement: However, there is a threshold where repairing an old toilet becomes a poor investment. Older toilets (manufactured before 1994) use 3.5 to 7 gallons per flush. Modern high-efficiency toilets use 1.28 gallons per flush. If you live in Kirkland or the greater Eastside, water rates are a significant factor. Upgrading an antiquated, constantly running toilet to a modern fixture can yield a return on investment through lower water bills within a few years. Furthermore, if the porcelain tank has hairline cracks, or if you are constantly plunging the bowl due to poor flush design, a full replacement is the superior operational decision. Rooter-Pal Plumbing, LLC can help you evaluate your current fixtures and recommend high-performance replacements that meet local building codes.
Common Mistakes to Avoid During Toilet Repairs
Even a straightforward DIY repair can escalate into a major plumbing emergency if best practices are ignored. Avoid these common pitfalls:
Using Drop-In Chemical Cleaners: Never place bleach tablets or chemical cleaners inside your toilet tank. These harsh chemicals rapidly degrade rubber flappers, plastic valves, and metal tank bolts, virtually guaranteeing a running toilet and potential catastrophic leaks. Over-Tightening Nuts and Bolts: Porcelain is incredibly strong under compression but highly brittle when subjected to localized stress. Over-tightening the fill valve nut or the water supply line will crack the tank, necessitating a complete toilet replacement. Ignoring the Supply Valve: The shut-off valve behind the toilet often sits unused for years. If it is corroded or stiff, do not force it. Forcing a seized valve can break the pipe inside the wall, causing severe water damage. If the valve won't turn smoothly, it is time to call a professional. Using the Wrong Replacement Parts: While universal kits work for many standard toilets, specialty brands (like Kohler or Toto) often require proprietary flappers and flush valves. Using a generic part on a proprietary flush valve will result in a poor seal.
Safety Tips and Precautions
Working with residential plumbing requires strict attention to safety and property protection. Always verify that the water supply is completely shut off before loosening any fittings. If you live in an older Kirkland home, be aware that galvanized steel pipes can be brittle; handle supply lines gently to avoid creating leaks behind the drywall.
Additionally, the water inside a toilet tank is generally clean potable water, but the tank itself can harbor bacteria and mold. Wear gloves, wash your hands thoroughly after completing the repair, and ensure your workspace is well-lit to clearly see water levels and mechanical alignments.
When to Call Rooter-Pal Plumbing, LLC for Toilet Repairs
While replacing a flapper or adjusting a float is well within the capabilities of a handy homeowner, certain scenarios require professional intervention.
You should contact Rooter-Pal Plumbing, LLC immediately if:
The Shut-Off Valve Fails: If the wall valve is seized, leaking, or fails to stop the flow of water, our licensed technicians can safely replace the valve without damaging your drywall. Water is Pooling at the Base: If you notice water on the floor around the base of the toilet, the issue is not just a running tank. The wax ring seal beneath the toilet has failed, requiring the entire toilet to be pulled, reset, and resealed. The Tank is Cracked: Even a hairline crack in a porcelain tank is a ticking time bomb. It cannot be permanently patched and requires a professional replacement to prevent thousands of dollars in water damage. You Experience Frequent Clogs: If your toilet runs constantly and also clogs frequently, there may be underlying issues with your home's main sewer line or venting system that require advanced diagnostic equipment.
Our team at Rooter-Pal Plumbing, LLC has found that addressing these issues promptly saves homeowners significant stress and expense in the long run.
Conclusion
A running toilet is a common problem with a systematic solution. By understanding the mechanics of your fill valve, flush valve, and flapper, you can accurately diagnose the issue and stop the continuous waste of water. Remember to perform the dye test, check your chain tension, and be cautious of over-tightening fittings.
Whether you decide to tackle a simple flapper replacement yourself or opt for a high-efficiency toilet upgrade, addressing plumbing leaks promptly protects your property and lowers your utility bills.
If you encounter stubborn leaks, seized valves, or require professional plumbing upgrades, do not hesitate to reach out to the experts. Call Rooter-Pal Plumbing, LLC today to schedule a service appointment. Our experienced team is ready to provide reliable, high-quality plumbing solutions for your Kirkland home or business. Contact us directly to ensure your plumbing systems operate flawlessly year-round.