The Ultimate Homeowner's Guide to Flushing and Maintaining Your Water Heater
Need a Reliable Plumber?
Call Us NowYou rely on your home's hot water supply for everything from comfortable morning showers to effectively sanitizing your dishes and laundry. However, deep inside your water heater tank, a silent and destructive problem is constantly growing. Sediment accumulation degrades heating performance, drives up your monthly energy bills, and ultimately causes premature tank failure.
For homeowners in Kirkland, WA and across the Eastside, proactive plumbing maintenance is the absolute best way to protect this vital and expensive appliance. Minerals from the municipal water supply settle at the bottom of your tank, creating a thick layer of sludge that forces your system to work harder than necessary.
This comprehensive guide will walk you through exactly how to flush your water heater safely and effectively. You will learn the necessary prerequisites, the exact step-by-step process to clear out damaging sediment, and how to identify when a minor maintenance task requires professional expertise.
Short Answer
To maintain optimal performance and prevent premature failure, you must flush your water heater at least once a year. The core process requires you to shut off the power or gas supply, turn off the cold water inlet, and attach a garden hose to the bottom drain valve. You then open the temperature and pressure (T&P) relief valve to break the internal vacuum and open the drain valve to flush out the water and sediment.
Once the tank drains completely, you perform a "power flush" by briefly turning the cold water supply back on to agitate and expel any remaining stubborn debris. After the water runs clear, you close the valves, refill the tank entirely, and safely restore the power or gas supply.
If you encounter a seized drain valve, heavily discolored water that refuses to clear, or a T&P valve that will not close properly, stop the process immediately. These operational roadblocks indicate severe internal degradation. In these scenarios, secure the system and reach out for professional assistance to prevent catastrophic leaks or water damage.
The Hidden Threat: Why Sediment Buildup Destroys Water Heaters
Every water heater acts as a settling basin for the microscopic minerals and particulates suspended in your home's water supply. When water enters the tank and heats up, calcium and magnesium separate and fall to the bottom. Over months and years, these loose minerals bake into a hardened, rocky layer of sediment.
This sediment layer creates a physical barrier between your heating element (or gas burner) and the water you are trying to heat. Your system must burn more gas or use more electricity simply to push heat through that rock-hard sludge. This aggressive overworking drives up your utility bills and drastically reduces the energy efficiency of your home.
Furthermore, sediment buildup traps intense heat against the bottom of the tank, deteriorating the protective glass lining inside the steel cylinder. Once that glass lining cracks, water reaches the bare steel, and irreversible rusting begins. If you hear loud popping, rumbling, or knocking sounds coming from your utility room, you are actively hearing water boiling underneath that trapped sediment layer.
Essential Prerequisites: Tools and Preparation
Before you begin the flushing process, you must gather the right tools and prepare your workspace. Attempting this maintenance without the proper equipment can lead to severe messes, damaged valves, or personal injury. You only need a few common household items to execute this job correctly.
Always prioritize safety, as the water inside the tank can easily reach scalding temperatures of 120 to 140 degrees Fahrenheit. Wear closed-toe shoes, long pants, and heavy-duty work gloves to protect your skin from accidental splashes or hot metal components.
Here are the essential tools you need to flush your water heater:
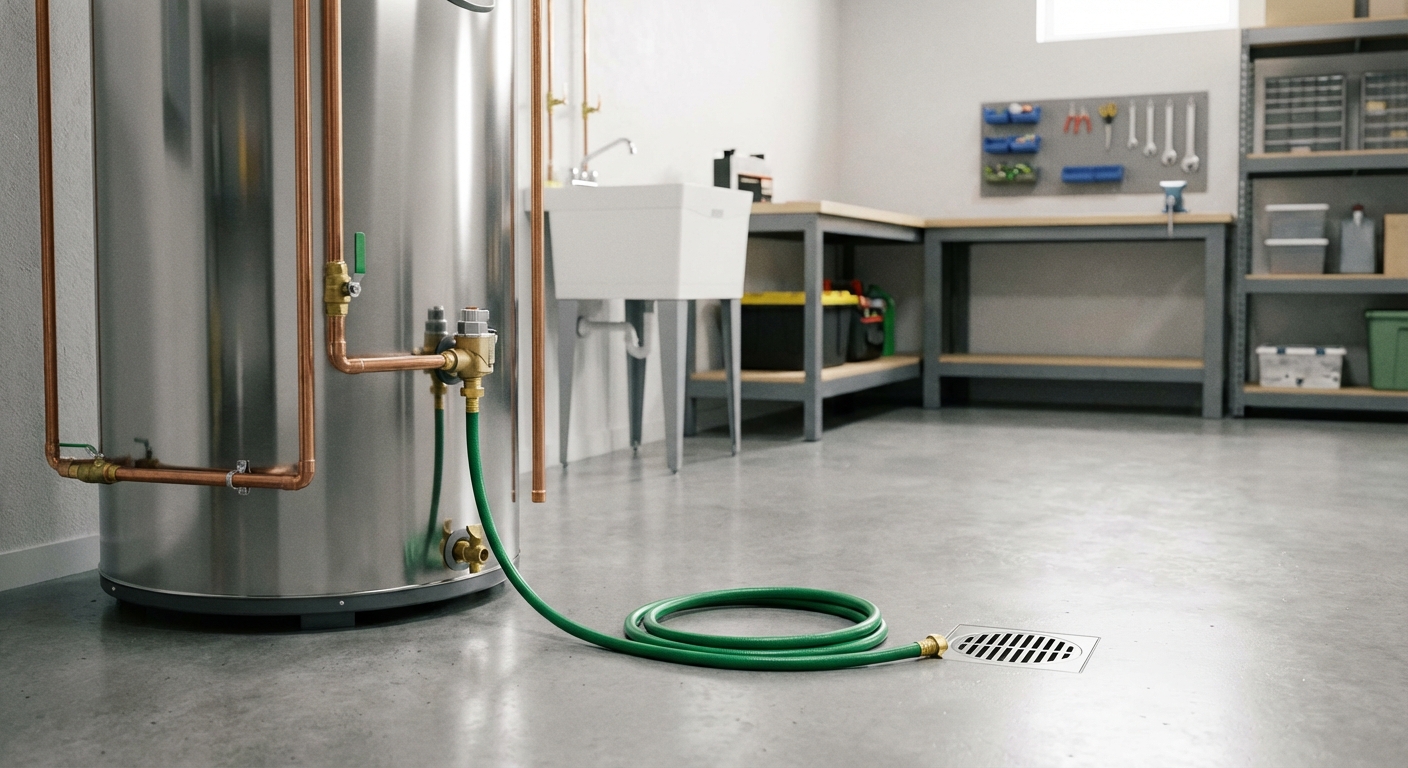
A high-quality, heavy-duty garden hose (long enough to reach a safe drainage point) A flathead screwdriver (if your drain valve lacks a handle) Slip-joint pliers or an adjustable wrench (to gently loosen stubborn hose connections) A large 5-gallon bucket (to monitor water clarity and catch initial drainage) * Heavy-duty insulated work gloves and safety glasses
Step-by-Step Instructions: How to Flush Your Water Heater
Executing a water heater flush requires careful attention to detail and strict adherence to the correct sequence of operations. Skipping a step can result in damaged heating elements, airlocks in your plumbing system, or localized flooding in your home.
Follow these precise steps to safely clear sediment from your residential water heater:
1. Disable the Energy Source: For electric water heaters, locate your home's main electrical panel and flip the dedicated breaker to the "OFF" position. For gas water heaters, turn the gas valve dial on the control box to the "Pilot" or "Off" setting. Never drain an electric tank while the power is on, as exposing the upper heating element to air will cause it to instantly burn out (known as dry-firing). 2. Shut Off the Water Supply: Locate the cold water shut-off valve situated on the pipe entering the top of the water heater. Turn this valve clockwise until it stops. If you have a lever-style ball valve, turn it until the handle is perpendicular to the pipe. 3. Connect the Drainage Hose: Thread your garden hose securely onto the drain valve located near the bottom of the tank. Route the other end of the hose to a floor drain, a sump pit, or outside into your driveway. Ensure the drainage location can safely handle 40 to 50 gallons of extremely hot water without damaging landscaping or flooding a basement. 4. Open the T&P Relief Valve: Locate the Temperature and Pressure (T&P) relief valve near the top of the tank. Carefully lift the metal lever to open it. This crucial step breaks the vacuum inside the sealed tank, allowing water to flow freely out of the bottom drain—much like taking your finger off the top of a liquid-filled straw. 5. Initiate the Drain Process: Slowly open the drain valve at the bottom of the tank. If the valve is plastic, turn it gently to avoid snapping the stem. Allow the tank to drain completely. The initial flow will likely be discolored and filled with scale. Let it run until the water flow stops entirely. 6. Perform the Power Flush: With the drain valve still open, turn the cold water supply valve back on for 15 to 20 seconds, then shut it off. This blast of high-pressure cold water stirs up stubborn sediment resting on the tank floor. Repeat this power-flushing cycle three to four times until the water exiting the hose runs perfectly clear. 7. Refill and Restore Power: Close the bottom drain valve tightly and remove the garden hose. Leave the top T&P valve open. Turn the cold water supply valve fully on to begin refilling the tank. Watch the T&P valve—once a steady stream of water flows out of it, the tank is completely full and all internal air has been purged. Close the T&P valve. Finally, turn the electrical breaker back on or return the gas dial to the "On" position.
Operational Tradeoffs: Equipment Upgrades and Decision Criteria
When conducting routine maintenance, homeowners must frequently weigh operational tradeoffs regarding their plumbing infrastructure. Understanding these decision criteria helps you manage your property more effectively and prevents costly emergency repairs.
One major tradeoff involves the type of drain valve installed on your water heater. Most manufacturer-provided drain valves are made of cheap plastic. These plastic valves are highly susceptible to cracking, stripping, and seizing over time. If you plan to stay in your home long-term, upgrading to a full-port brass ball valve is a superior operational choice. While it requires draining the tank and a minor upfront cost, a brass ball valve allows for faster draining, prevents clogs during maintenance, and eliminates the risk of a plastic valve snapping off in your hand.
Another critical decision point is evaluating the sacrificial anode rod. This internal metal rod attracts corrosive elements in the water, sacrificing itself to protect the steel tank. Checking and replacing the anode rod every three to five years significantly extends the life of the heater. The tradeoff here is labor versus longevity. Extracting an old anode rod often requires heavy leverage and high ceiling clearance. If your tank is already ten years old and heavily rusted, investing time and money into a new anode rod yields diminishing returns compared to planning for a total unit replacement.
Finally, consider the tradeoffs between DIY maintenance and professional service. While flushing a water heater is a manageable DIY task for many Kirkland homeowners, it carries inherent risks of water damage and scalding. Hiring a professional trades time savings and risk mitigation for a service fee, ensuring the job is done to exact municipal and industry standards.
Crucial Safety Tips and Common Pitfalls to Avoid
Plumbing systems operate under immense pressure and handle extreme temperatures. When you interact with these systems, avoiding common mistakes is just as important as executing the correct steps. A single error during a water heater flush can escalate into a major home emergency.
Keep these vital safety tips and common pitfalls in mind:
Never dry-fire the system: Always double-check that the electrical breaker is completely off before draining, and ensure the tank is 100% full of water before turning the breaker back on. A dry-fired heating element is permanently destroyed in seconds. Beware of faulty T&P valves: If your T&P valve is old or heavily calcified, opening it manually might cause it to stick open permanently. If it fails to snap shut and seal properly, you will have a continuous leak that requires immediate valve replacement. Handle plastic valves with extreme care: If a plastic drain valve feels stuck, do not force it with a wrench. Snapping the valve while the tank is full of hot water will result in an unstoppable 50-gallon flood in your home. Monitor the hose routing: Ensure your garden hose does not have kinks or holes. Pumping 130-degree water through a compromised hose can cause it to burst, leading to severe burns and water damage.
When It Is Time to Call Rooter-Pal Plumbing, LLC
While annual flushing is an excellent DIY practice, certain warning signs indicate that your water heater requires expert intervention. Knowing when to step back and call a professional protects your property from severe water damage and ensures your family's safety.
If you open your drain valve and nothing comes out, your tank is suffering from severe sediment blockage. Do not attempt to clear this blockage by shoving wire or tools into the valve, as this can permanently damage the tank lining. Our team at Rooter-Pal Plumbing, LLC has the specialized equipment and expertise to safely back-flush the system and clear hardened blockages without destroying the unit.
Additionally, if you notice rust accumulation around the bottom of the tank, pooling water near the base, or heavy corrosion on the water supply lines, DIY maintenance will no longer solve the problem. These are structural failures indicating the tank's integrity is compromised. When you spot these red flags in your Kirkland home, it is time to halt your maintenance efforts and bring in a qualified expert.
Rooter-Pal Plumbing, LLC recommends scheduling a professional inspection if your water heater is over eight years old and has never been flushed. Attempting to flush a deeply neglected tank can sometimes dislodge sediment that is actually plugging existing rust holes, inadvertently causing a massive leak.
Conclusion
Flushing your water heater is a fundamental maintenance task that pays massive dividends in energy efficiency, system reliability, and appliance longevity. By dedicating just an hour a year to clear out damaging sediment, you protect the internal glass lining, reduce the workload on your heating elements, and ensure your home has a consistent supply of hot water.
Remember to always prioritize safety by shutting off the power supply, carefully managing hot water drainage, and never forcing stuck or brittle valves. Understanding your operational tradeoffs, such as upgrading to brass drain valves or inspecting your anode rod, elevates your home maintenance strategy from reactive to highly proactive.
If you encounter seized valves, heavily rusted components, or stubborn blockages during your maintenance routine, do not risk a catastrophic leak. Reach out to the local experts who understand exactly how to handle complex Eastside plumbing challenges. Give us a call at Rooter-Pal Plumbing, LLC today, and let our experienced team ensure your water heater operates safely and efficiently all year long.